
|
KERALA AGRICULTURAL UNIVERSITY |
CEREALS AND MILLETS
RICE (Oryza sativa)
Rice can be cultivated under a variety of climatic and soil conditions. Rice cultivation is conditioned by temperature parameters at the different phases of growth. The critical mean temperature for flowering and fertilization ranges from 16 to 200C, whereas, during ripening, the range is from 18 to 32oC. Temperature beyond 350C affects grain filling. Rice comes up well in different soil types. For normal growth, a pH range of 5.0-8.0 is suitable. In general, rice can be grown as transplanted or direct sown crop during three seasons as shown below depending on the agroclimatic situations
During second crop, for higher yield in photosensitive high yielding varieties in Palakkad district, where assured irrigation is available, the crop commence-ment may be adjusted in such a way that it flowers only during the second fortnight of December, facilitating proper integration with the weather, better utilization of applied fertilizers and high filling percentage.


Tips on quality seed production in rice and maintenance of viability of stored seeds
Ensure that the seeds for
further multiplication are either from a research station or government farm or
recognized seed producers. The land used for seed production should be free from volunteer plants of
other varieties grown previously.
To ensure genetic purity, a
minimum isolation distance of 3 m from other
varieties may be given in the field.
Harvesting for
seed purpose can also be done leaving a border row of 3 m within the field.
Rogue diseased plants, weeds and
off-types in time.
Line planting facilitates roguing and
giving alleyways of 30 cm after every 3 m helps
in manuring, plant protection operations and supervision.
Drain water at least one week
before harvesting to ensure that the plants attain uniform maturity at harvesting. Harvest
the crop when 80 per cent of the grains in a panicle are mature (at
physiological maturity). During summer months, ensure that
the plants get sufficient water at dough stage
till maturity.
Thresh the sheaves on the same day
of harvest, as seeds of heaped sheaves may not perform well.
Dry seeds properly and ensure that
the moisture content is not more than
13 per cent.
Avoid excess drying in summer
months especially for short duration varieties as
it reduces the period of viability.
While drying and storing, avoid contamination from yards or through
baskets or bags.
Seeds may be stored in
damp-proof situations for avoiding absorption of
moisture from atmosphere thereby losing viability early.
Polythene bags of 700 gauge or
double gunny bags may be preferred for storing. Polythene bags of 400 gauge density
may be preferred for storing paddy seeds dried to 10 per cent moisture content or less.
Never stack seed bags in open
floors. Store on pallets or wooden benches. The benches should be 30 cm away from
wall and floor for proper aeration.
Never pile more than eight bags in a
stack. This should be limited to three bags if the seeds require further drying.
Avoid storing plant protection
chemicals, herbicides, fertilizers etc. in seed store.
Fill up the cracks and crevices
of storeroom by cementing to make it rat proof.
Spray 2 per cent malathion solution in the godown before storing seeds to check
insect pests.
Place pieces of cloth dipped in neem oil between stacked bags or neem oil
cake covered in cloth bags inside seed bags to ward-off pests.
Test seed germination at monthly
intervals if the seeds are to be stored for more
than eight months.
The viability of short duration varieties
can be extended for a further period of 2-3 months
at 80 per cent level if the seeds are soaked
for four hours in water and re-dried in
shade, back to original weight at 13 per cent
moisture content. Seeds of short duration varieties
like Jyothi and Triveni of virippu crop reach this level of germination 9-10 months
after harvest and that of mundakan 8-9 months after harvest when stored under
ambient conditions.
To keep sprouted pokkali seeds viable
for two weeks, the seeds are to be kept in baskets made of plaited coconut leaves
lined with koova, banana, karingotta or teak leaves.
Seed rate
Transplanting 60-85 kg
ha-1
Broadcasting 80-100 kg
ha-1
Dibbling 80-90 kg
ha-1
The above seed rates are specified
for farmers' field on the basis of minimum germination of 80 per cent. In
pokkali cultivation, for Vyttila varieties, 100 kg
ha-1 may be sown on the beds or mounds
formed in the field.
Seed rate may be enhanced from
80-100 kg ha-1 to 125 kg
ha-1 for Kuttanad, provided excess plants are removed in
order to maintain optimum plant population.
Seed treatment
Dry seed treatment
Dress seeds with P. fluorescenes
@ 10 g/kg of seeds before sowing or
with the following fungicides on the previous day of sowing (12 to 16 hours ahead) at
dosage given below:
1. Carbendazim 2g per kg of seed
Wet seed treatment
Soak seed for 12 to 16 hours in a
solution of P. fluorescenes @ 10 g/litre of water
per kg of seed or Carbendazim 2 g / kg
of seed per litre of water and drain to induce germination.
Treatment with Carbendazim will
protect the seedlings from blast disease up to 30
to 60 days after sowing.
The above seed treatment can also
be used for protection from seedling blast in endemic areas. Soak paddy seeds in CuSO4 (0.25 per cent) and ZnSO4
(1 per cent) solution for
24 hours. Drain and keep for sprouting.
For soaking 1 kg of seed, 1 litre of micronutrient solution would be needed.
Nursery
For transplanting, healthy seedlings
have to be raised in seedbed. Healthy seedlings can cope up better with the field
conditions that affect the growth of young rice
plants. Adopt wet or dry method for raising seedlings. The choice depends primarily
on the availability of water. Wet method
The wet method can be adopted in
areas where water is available as in the second crop season. Seedlings raised by the wet
bed method can be harvested one week earlier. The seedbed should be prepared in
advance, so that the pre-germinated seeds can be
sown in time. As far as possible, fertile lands
with irrigation and drainage facilities should be selected for raising the nurseries. Such
lands should be suitably located to receive full sunlight. The following are the steps in
raising wet nursery. Plough and harrow the fields two or
three times until the soil is thoroughly puddled and
levelled. Prepare raised beds 5 to 10cm height 1 to 1.5m width and of
convenient length with drainage channels between
the beds. The total seedbed area should be 1000 m2 for each hectare of the field to
be transplanted.
Apply compost or cattle manure @
1.0 kg/m2 of the nursery bed and mix well
with the soil at the time of preparation of the field.
Treat the seeds by wet method. Drain
and incubate in warm moist place for sprouting. Never allow the seeds to dry up.
Moisten them occasionally. Sow germinated seeds on the third day. Delay will result in poor
seedling stand. Drain occasionally to encourage production of vigorous seedlings with
short roots. Flooding the soil with too much water for long periods produces tall and
weak seedlings, which do not readily recover
during transplanting.
If symptoms of nitrogen deficiency
are observed, broadcast urea @ 1 kg for 100
m2 as top dressing about 10 days prior to
pulling out of seedlings, depending upon the
duration of variety.
Dry method
This method is practised in areas
where sufficient water is not available and the time of planting is uncertain. During first
crop season, wherever transplanting is done depending upon receipt of rainfall, it is
safer to adopt this method since growth of the seedlings can be controlled. Plough the nursery area to a fine
tilth. Prepare raised beds of 1 to 1.5 m width,
15 cm in height and of convenient length. Apply compost or cattle manure at the rate of 1
kg/m2 of the nursery bed and mix well with
the soil at the time of preparation of the field.
Sow the seeds treated as described
under dry seed treatment method evenly over the bed and cover with fine sand or soil.
Water the nursery as and when
required depending upon the receipt of rains.
Note: Rice seedlings from solarised
nursery beds showed high initial growth, early maturity and resistance to leaf
blast disease (ad hoc recommendation). Age of seedlings
Seedlings are ready to be pulled out
when they attain the stage of 4-5 leaves, about 18 days after sowing in the case of
short duration varieties and 20-25 days after
sowing in the case of medium duration varieties. Under ill drained conditions, long
duration varieties may be planted 30 days after sowing. Seedlings more than 30 days
old when transplanted in the field recover slower than younger seedlings, especially, if
they suffer stem and root injury. However, during the virippu season, age of seedlings can go up to 35 days in case of medium
duration varieties and 25 days for short
duration varieties. If the seedlings are
over aged, plant at a closer spacing with 3 or 4 seedlings per hill and apply extra dose
of nitrogen @ 5 kg/ha as basal dressing. Pruning of the top portion and root is
not recommended as it inflicts wounds through which disease causing organisms
may subsequently enter.
Preparation of land
General
Plough the field thoroughly to
incorporate the weeds and straw into the soil. Ensure
a smooth, level field for transplanting the seedlings. It would be better to transplant
10-15 days after incorporating
organic manure. Before transplanting or sowing, apply manures and fertilizers at the
rates specified for the region and varieties as indicated in Table 4. Apply fertilizers on
the drained soil at the time of final ploughing
and levelling and thoroughly mix into the soil. Kole
For the first crop in Kole, after
the cessation of the heavy monsoon, dewatering is effected by petti and para or
centrifugal pump and rarely by chakkram. Land is ploughed thoroughly and transplanting
is done. For the second crop, land is
prepared thoroughly and direct sowing of sprouted seeds or transplanting is done.
Onattukara
With the onset of pre-monsoon
showers, land is ploughed thoroughly. Dibbling of unsprouted seeds behind the country
plough is the common practice.
Pokkali
By April, the bunds are being
strengthened and sluices repaired for regulating
water level. Fields are then drained during low
tide and the sluices are closed. When the soil in the field becomes dry, mounds of 1 m
base and 0.5 m height are formed. This facilitates the washing down of the dissolved salts
from the surface of the mounds with the onset of monsoon, which are ultimately removed
from the field by tidal action. The mounds act as elevated
in situ nursery and protect the seedlings from flash floods.
A special method is adopted for
sprouting the seeds. The seeds are tightly packed
in baskets made of plaited coconut leaves, the inside of which is lined by banana or
teak leaves. These baskets are then immersed in fresh water ponds for 12 to 15 hours.
They are then taken out and stored in shade. The radicle just sprouts and remains
quiescent under this condition for more than 30
days. When the soil and weather conditions
Irrigation may be commenced on the
5th day after sowing and continued up to
the 7th day, to a depth of about 5 cm. After
this period, irrigate the seedbed continuously to a depth of about 5 cm in order to
control weeds.
Irrigate seed beds a day before pulling out the seedlings to soften the soil and
to facilitate washing of roots. Wash off mud and soil from the roots carefully and tie
the seedlings into bundles of convenient size for transplanting.
Kuttanad
Drain out standing water from the main field. Plough the field thoroughly
to incorporate the weeds in the field. Ensure a smooth and levelled field. Maintain a thin
film of water to facilitate sowing so that the germinated seeds do not get covered
with clayey soil, which affects seedling establishment.
become favourable for sowing, the baskets containing the seeds are re-soaked for 3 to
6 hours before sowing. The mounds in the field are then raked and top levelled. The
sprouted seeds are sown on the top of mounds,
which act as an in situ nursery. When the seedlings
reach a height of 40-45 cm (in 30-35 days), the
mounds are cut into pieces with a few seedlings,
which are uniformly spread in the field.

* Location specific recommendations. Strict surveillance of pests and diseases is a must under such situations.
** Wherever the soil K status is medium to high based on soil test data and also where
incorporation of straw is a practice and tidal contribution of the nutrient is significant.
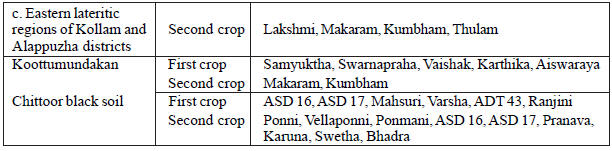
Koottumundakan
In this system of rice cultivation,
a mixture of seeds of a non-photosensitive (virippu) variety and a
photosensitive (mundakan) variety of rice in the
proportion 70:30 (w/w) is sown during virippu
season. This system is practiced in areas where sowing / planting of mundakan crop is not possible due to excess water in the
field. Hence, mixture of the two varieties
is sown in the first crop season (April-May). The first crop variety will be ready
for harvest in August-September and
the second crop variety can be harvested in
December-January. No cultivation is
practised after the harvest of first
crop season variety. But both organic and
inorganic manures are applied and incorporated. Though the yield will be less than that of
the two independent crops, this type of cultivation is taken up in view of the
special circumstances prevailing in such areas.
Transplanting
Transplant seedlings of appropriate
age for the variety @ 2-3 seedlings per hill in rows, at spacing as shown in Table 5.
Leave wider row of 30 cm after every 3 m to facilitate spraying and other
cultural operations. Transplant seedlings at a depth of 3-4 cm
Wet seeding by seed drums and
weed control by cono weeder
Drum seeding and cono weeding can be safely adopted without sacrifice
in productivity. It is suitable for areas where
efficient water management is possible (especially during rabi) and during
kharif in areas where torrential rains are absent
(Chittur tract). For short duration varieties 15cm
spaced and for medium duration varieties 20cm spaced seed drum is recommended. Manuring
Organic manuring
Apply organic manure in the form
of farmyard manure or compost or green leaf @ 5 t
ha-1 and incorporate into the soil
while ploughing. Vermicompost or coirpith compost @ 2.5 t
ha-1 can be substituted for 5 t
ha-1 FYM in Onattukara region.
The entire quantity of phosphatic fertilizers
may be applied along with the organic manures.
Use of biofertilizers is recommended
(See chapter on biofertilizers). Green crop manuring
Cowpea may be raised as an intercrop
in dry seeded low land (semi-dry) rice by sowing 12.5
kg/ha seed along with rice to serve
as a source of green manure. When the rice field gets submerged with the onset
of southwest monsoon, cowpea at the age of
about six weeks and at active
vegetative stage decays and gets self-incorporated
in the soil adding substantial quantity of green manure. Such a system of
concurrent growing of cowpea also reduces weed pressure in semi-dry rice.
Concurrent growing of cowpea/daincha A. Dry seeded rice
When there is an undue delay in the
onset of monsoon, concurrently grown cowpea in rice fields can be incorporated by
spraying 2,4 D @ 1.0 kg ha-1 at 30-40 days
after sowing without affecting the yield with a substantial reduction on weed incidence.
B. Wet seeded rice
In wet seeded rice, daincha can be
raised as an intercrop by sowing 20 kg seed of daincha
ha-1 along with rice (seed rate 60 kg
ha-1) to serve as a source of green manure.
Daincha can be incorporated by spraying
2, 4D @ 1.0 kg ha-1 at 30 days after
sowing thereby adding substantial quantity of
green manure. System of concurrent growing of daincha can also reduce the weed
pressure in wet seeded rice.
Fertilizer application
The rates of N,
P2O5 and K2O recommended as fertilizers are
given in Table 4 and stages of application in Table 6.


For modan cultivation (upland crop) and direct seeded crop in wet lands, apply nitrogen in three equal split doses, first as basal dressing, second at tillering stage (three weeks after seeding) and the third at panicle initiation stage (about thirty days before flowering). Apply the full dose of phosphorus at the time of land preparation as basal dressing. Apply potash either in a single dose as basal or in two split doses half as basal and half at the panicle initiation stage.
In Kuttanad region, wherever wet broadcasting (direct seeding) is adopted,
give the first basal application of the nitrogen at the time of letting in water after
drying the field. Water-soluble phosphorus can be recommended for application in two
split doses in Kuttanad region, as basal and at maximum tillering stage.
The general principle to be followed
is that in light soils as well as in soils with high
leaching, nitrogen may be applied in three
or four split doses according to the duration of the variety.
For typical Onattukara region, where
soil is sandy loam and with iron toxicity problem, apply 5 tonnes of organic matter
or vermicompost 2.5 t and 67.5 kg K2O
ha-1.
During the first crop season, when
basal application of nitrogen is not possible due
to incessant rains, basal dose can be shifted to 15 days after transplanting.
In coarse sandy loam soils with
high percolation as in Onattukara region, nitrogen and potash fertilizers may be applied in
five equal splits at planting, 15th,
38th, 53rd and
70th day for medium duration varieties
which coincide with the stages of early tillering,
neck node differentiation, early reduction
division and heading stages respectively in the
case of medium duration varieties.
For Thiruvananthapuram and Malappuram districts, phosphorus application is
essential for increasing rice yields. Rock
phosphate may be substituted for superphosphate.
Basal dose of nitrogen may be postponed to initial tillering phase of rice crop,
especially during the rainy season. Split application
of potash @ 50 per cent basal, 25 per cent at tillering and 25per cent at panicle
initiation stage is recommended for this region.
In sequential cropping of rice,
application of 50 per cent of the nutrient
requirement (on nitrogen equivalent basis) as
organics (FYM, rice straw, green manure) and 50
per cent as fertilizers during kharif season and the entire dose of nutrients as fertilizers
in rabi season enhances the grain and straw yield. The organics may be incorporated
3 weeks before transplanting.
Application of 25 per cent of the
nutrient requirement as organics and 75 per cent
as fertilizers during kharif season and reducing the fertilizer dose of rabi by 25 per cent gives comparable yield with full
POP recommendation during both seasons.
Specific dose of fertilizer for Koottumundakan system
A fertilizer dose of
N:P2O5:K2O
20:10:10 kg ha-1 for the first crop and 30:15:15 kg
ha-1 for the second crop is recommended
for high yield in Koottumundakan system. N and
K2O may be applied in two equal parts for the first crop, one as basal and other
at panicle initiation stage.
P2O5 may be applied fully as basal. The fertilizer for second
crop may be applied as a single dose immediately after the harvest of the first crop
(ad hoc recommendation)
Fertilizers
(N:P2O5:K2O) @ 40:20:20
kg ha-1 for virippu and 20:10:10 kg
ha-1 for the photosensitive mundakan crop
are recommended as economic dose for the northern region under
Koottumundakan practice.
Methods of fertilizer application
For pre-planting application, apply
the fertilizers at the final ploughing. In areas where availability of water is
assured, temporarily draining the field one day
prior to application and re-flooding after twelve hours is recommended for top dressing
of fertilizer.
For increasing the efficiency of urea
for top dressing, mix urea with six times its weight of slightly moist soil and apply to the
field 24-28 hours after mixing. Oil seed
cakes such as punna and neem cakes can also
be mixed with urea (1 part of oil cake + 5 parts of urea by weight) for increasing
fertilizer use efficiency. This method is
particularly useful for basal application of
nitrogen. Under special conditions of drought and
water-logging, apply nitrogen as foliar spray.
Urea may be applied as a low volume spray at 15 per cent concentration using power
sprayer or at 5 per cent concentration using a
high volume sprayer, the quantity applied in one application being limited to 15 kg
ha-1.
When zinc deficiency is noticed, apply zinc sulphate @ 20 kg
ha-1. Early stages of zinc deficiency are evidenced by
interveinal chlorosis, bleaching of midribs and light
yellow colouration of the leaf. Older leaves
develop brown rusty spots and are extremely
brittle. Zinc sulphate and potash should not be
applied on the same day.
The effect of zinc application can
persist upto five years depending on the soil and cropping pattern. Hence soil application is
not required for every season. Soil zinc status should be monitored before application
to avoid accumulating toxic concentration of zinc.
Split application of water-soluble phosphatic fertilizers in two equal splits
as basal and at maximum tillering stage is effective in giving higher grain and
straw yield than the full dose as basal dressing
under certain situations.
Application of chemical fertilizers can
be dispensed for Vyttila-1 and Vyttila-2 in
pokkali rice fields.
When the soil has less than 10 ppm
of calcium chloride extractable sulphur or
15 ppm of phosphate extractable sulphur, substitute urea with ammonium
phosphate sulphate to correct sulphur deficiency.
For medium duration rice grown in brown hydromorphic soils ammonium
phosphate sulphate may be used to supply 25 kg
sulphur per hectare to protect the crop from
sulphur deficiency (ad hoc recommendations).
Application of magnesium as basal
dose in the form of magnesium sulphate (16 per cent MgO) or magnesite (40 per
cent MgO ) or dolomite (10 per cent MgO) @ 20 kg MgO/ha is effective in giving
a significant increase in grain and straw yield of rice in magnesium deficient soils. In
non-deficient soils, a marginal increase in grain and straw yield is also obtained. On per
unit MgO basis, magnesite is more concentrated and cheaper than magnesium sulphate.
In iron toxic laterite soils of
Kerala, application of 120 kg potash
ha-1 + lime 150 kg ha-1 + silica 100 kg
ha-1 (as sodium silicate 250 kg
ha-1 or fine silica 100 kg
ha-1 or rice husk ash 500 kg
ha-1) is recommended for higher yields.
Liming
In general, addition of lime is
absolutely necessary when the pH is lower than 5.5 and it is advisable when pH varies
between 5.5 and 6.5.
Apply lime @ 600 kg
ha-1 in two split doses, the first dose of 350 kg
ha-1 as basal dressing at the time of first ploughing
and the second dose of 250 kg ha-1 as top
dressing about one month after sowing/transplanting.
For pokkali areas, apply lime @ 1000
kg ha-1, 50 per cent at the time of
preparation of mounds and the rest at the time of dismantling the mounds.
A time lag of one week should be
given between application of lime and fertilizers. For top
dressing, lime may be applied one week prior to the application of fertilizers. Water management
Maintain water level at about 1.5 cm during transplanting. Thereafter increase
it gradually to about 5 cm until maximum tillering stage. Drain water 13 days
before harvest.
Note: In areas where water for irrigation
is assured and where acidity is high, draining and reflooding every 15
days is recommended. In flood prone
areas, aged seedlings of Mahsuri or other varieties recommended for waterlogged conditions may
be planted. The date of planting may be adjusted so as to avoid
synchronization of the critical stages of maximum tillering or heading with the usual
flood period in the tract.
During the mundakan crop season,
water level of 5 cm need not be
maintained continuously after the cessation of
northeast monsoon. Five centimetre irrigation once
in 6 days will be quite adequate for project areas where water is assured.
For summer rice (in situation where
the ground water level is low, i.e., within 1m from
the surface), 5 cm irrigation two days
after disappearance of ponded water is sufficient instead of 5 cm continuous
submergence throughout the crop period.
Irrigation schedule for rice under
limited water resources
For summer rice under limited
resources of water, phasic stress irrigation can
be practised to the advantage of saving substantial quantity of irrigation water
without any significant reduction in yield. About 20-30 per cent more area can be
irrigated with the same water resources by
adopting any of the following phasic stress
irrigation schedules (Table 7). Depending up on the schedule, water saving ranges from
24-36 per cent of the requirement for 5
cm continuous submergence throughout the crop growth. Grain yield reduction in the
above practice is only 0.1 per cent to 1.6 per cent.
Weeds and their management
Common weeds in rice fields of
Kerala are:
Grasses: Oryza rufipogon
(varinellu), Echinochloa crusgalli
(kavada), E. colona (kavada), E. stagnina
(kavada), Saccolepis interrupta
(polla), Isachne miliacea (chovverippullu, naringa).
Sedges: Cyperus iria
(manjakora, chengoal), C. difformis
(thalekkattan), Fimbristylis miliacea (mungai)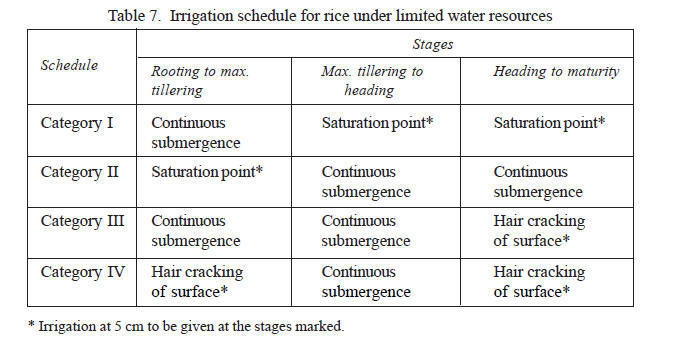
Broad leaved weeds: Monochoria vaginalis (neelolppalam), Ludwigia perennis (neer-grampu), Limnocharis flava (nagappola), Ammania baccifera (nellicheera).
Ferns: Salvinia molesta (African payal), Marsilea quadrifolia (naalilakodian), Azolla pinnata (azola).
Algae: Chara spp. (chandi),
Spirogyra spp. (payal).
Control
Keep the rice fields free from weeds up to 45 days either by hand weeding or by use of herbicides. The recommendation for use of herbicides in different systems of rice culture are given below:
A. Dry seeded
rice [upland and lowland (semi-dry) rice]
Spray any of the following
pre-emergent herbicides: butachlor @ 1.25 kg ai
ha-1, oxyfluorfen @ 0.15 kg ai
ha-1, pendimethalin @ 1.50 kg ai
ha-1, pretilachlor @ 0.75 kg ai
ha-1 on the same day of seeding or within
six days of seeding.
B. Wet seeded rice
(direct seeding with sprouted seeds under puddled conditions)
Spray any of the following herbicides:
(a) Butachlor @ 1.25 kg ai
ha-1 6-9 days after sowing;
(b) Pretilachlor + safener @ 0.45 kg ai ha-1 3-5 days after sowing. Give a
follow up application of 2,4-D @ 0.8 kg ai ha-1 at 20 days after sowing.
(c) Pretilachlor @ 0.45 kg ai
ha-1 at
3-4 DAS and one light hand weeding at
28 DAS for wet sown rice in kole land.
To control Echinochloa sp.
spray cyhalofop butyl @ 0.08 kg ai ha-1 at
15-18 days after sowing.
In certain areas like Kuttanad, wild
rice has become a menace in recent years. If effective water control is possible,
the following agronomic practices can successfully control the infestation of
wild rice.
(a) Coat dry seeds with 20 per
cent calcium peroxide using 4 per cent PVA solution as an adhesive and then broadcast in the
field with 10-15 cm column of standing water.
(b) Maintain the water level for 10-12
days to prevent germination of wild rice. (c) Drain the field and apply N and
K fertilizer as per recommendation for rapid growth of the rice seedlings.
(d) Where yeranda (common teal) is a problem, bird scaring should be
arranged till the water is drained.
C. Transplanted rice
Apply any of the following herbicides
at 0-6 days after transplanting.
Pendimethalin @ 1.5 kg ai
ha-1, butachlor @1.25 kg ai
ha-1. For controlling broad leaved weeds and sedges 2, 4-D sodium
salt may be applied @ 1 kg ai ha-1 on 25 DAT.
Pre emergence application of 2, 4-D sodium
@ 0.8 kg ai ha-1 on 5 DAT can control all
the three groups of weeds
viz. grasses, sedges and broad leaved weeds.
Wherever fields are levelled and
water management could be effectively done 2, 4-D can be mixed with 10kg urea/ha and
broadcast on 20 DAS/DAT. This would save the spraying charges. Almix 20WP(Chlorimuron ethyl
10% +Metsulfuron methyl 10%@ 4g ai
ha-1+ 0.2% surfactant at 20-25 DAS/DAT
is equally effective as 2,4-D for controlling sedges and broad leaved weeds in rice fields.
This herbicide is effective for controlling Marsilia
quadrifolia also. Almix can be given as follow-up application to
cyhalofop butyl used for the control of grass weeds with a minimum of one-day gap between
the applications.
Apply 2,4-D Na salt as pre-emergence broad-spectrum herbicide @ 0.8 kg ai
ha-1 at 5 days after transplanting. Spray on
moist soil surface with a fan nozzle to give
blanket coverage. Use 300-400 litres of spray fluid.

Management of Salvinia molesta
(African payal)
Trampling salvinia in
situ in the wet lands a week before transplanting will control
the weed and add to soil fertility. Herbicides should be applied only in areas
where protected drinking water supply is available
(see Annexure).
Precaution while using herbicides
(1) Apply herbicides at the
recommended dose and time. (2) Drain the field
before herbicide application. (3) Re-flood after
48 hours to prevent further weed
germination when post emergent herbicides are used.
For pre-emergent herbicides, wait for a week before re-flooding the field. (4) Use
herbicide nozzle (flood jet / flood fan) for
herbicide application. (5) Move at uniform speed
when applying herbicides. (6) Spray without gaps and overlapping. (7) Use 300-400 litres
of water per hectare for spraying the herbicide.
Pests and Diseases
Adopt control measures only if the pest
/ disease population exceeds the economic threshold levels which are given in Table 9.
Pests
Rice stem borer
(Scirpophaga incertulas)
Symptoms
In the vegetative phase, the central
shoot dies off turning yellow in colour (dead
heart). In the ear bearing stage, the ear head
appears completely chaffy and white in colour
(white ear head). Both come out easily when pulled up and show indication of feeding injuries
at the base.
Management
1. Collect egg masses from the
nursery plants and observe for parasitisation. 3. In areas where stem borer occurs as
a serious pest in all seasons, apply any one of the following insecticides first
15-20 days after transplantation and
then at the boot leaf stage keeping minimum water level: Cartap hydrochloride (spray or granules),
quinalphos, carbaryl, carbosulfan, flubendiamide,
indoxacarb, malathion or spinosad.
4. Use sex pheromone for the control of
rice stem borer as detailed in Table 10.
Gall midge (Orseolia
oryzae)
Symptoms
Presence of silver shoot in the place
of central leaf is the prominent symptom. The symptom appears from the nursery to
the flowering stage. However, in very young seedling the silver shoots are not
always expressed. Instead, a swelling at the basal portion and excess tillering are often noticed.
Management
1. Use tolerant varieties like
Pavithra, Panchami and Uma
2. Avoid late transplantation during the
first crop season.
3. Careful monitoring of the crop
seasons in the month of July during additional
crop season and October during puncha season.
4. Use optimum seed rate of 100 kg
ha-1
5. Destruction of collateral host like
wild rice, Cynodon dactylon, Ischaemum aristatum,
Echinochloa spp. and Isachne sp.
6. Dipping germinated seed in 0.2 per
cent chlorpyrifos solution for 3 h before sowing give protection up to 30 days.
7. In transplanted crop the root of
seedlings may be dipped in 0.02 per cent chlorpyrifos suspension for 12 h prior
to planting.
8. The nursery treatment has to be
followed by main field treatment, 10-15 days after transplantation using any one of
the following insecticides: quinalphos, carbaryl.
9. In areas where the pest is of
regular occurrence, apply granules of quinalphos (250g ai/ha) or chlorpyriphos 10G
(0.5 kg ai/ha) within 10 days after
sowing. The granules should be broadcast in 2-3 cm of water and the field should
be impounded for at least 4 days.
Rice bug (Leptocorisa acuta)
Symptoms
Look for the presence of bug in the
field during the early ear bearing stage. Due to de-sapping, grains show brownish
discoloured patches on the husk.
Management
1. Strict vigilance is necessary at
milky stage.
2. Keep the field and bunds free of
weeds and grasses.
3. Avoid overlapping cultivation in an Ela.
4. When the bug is seen in large
numbers apply one of the following insecticides: Malathion, carbaryl.
Note: Since the occurrence of the
bug coincides with the flowering stage, application of the insecticide may
be done either before 9 a.m. or after
3 p.m. so that fertilization of
the flowers is not adversely affected.
Leaf folder (Cnaphalocrocis medinalis)
Symptoms
The leaves of the plant are seen
folded, rolled and often webbed together with
white patches on them indicating the areas fed by caterpillar. When such folded leaves
are opened up, larvae can be seen. Shaded conditions and application of excess
nitrogen are conducive for leaf folder attack.
Management
1. Open up the leaf folds with the help of
a thorny twig.
2. Apply one of the following insecticides
in the field where the symptoms of attack are manifested: quinalphos, carbaryl,
phosalone, acephate, flubendiamide, cartap hydrochloride, indoxacarb
and dichlorvos.
Note:In the initial stages restrict spraying
to infested patches only. The field may be sprayed completely in case
the infestation occurs uniformly.
Brown plant
hopper (Nilaparvata lugens)
Symptoms
Yellowish circular patches appear
here and there in field. The plants in these areas dry up very soon (hopper burn) and
the yellowing and drying extend rapidly. Examine the plants as soon as the yellowing
appears. Presence of the hoppers at the base of
the plants confirms the infestation. Very close planting leads to enhanced attack.
Management
1. Use resistant varieties such as
Jyothi, Bharathy, Aiswarya, Kanakom, Nila etc. for cultivation.
2. Apply one of the following
insecticides as soon as the yellowing symptom
is observed, covering the infested
patches and the areas surrounding
the patches: carbaryl, quinalphos, acephate, thiamethoxam, phosalone and
imida-cloprid. While spraying, care has to be taken to see that the insecticides
reach the base of the plants.
3. Drain away water from the field and
keep it in that conditions until the pest population dwindle.
4. In Kuttanad tract, early planting of
paddy in September-October is advisable, wherever possible. 6. Avoid spraying synthetic pyrethroids.
Rice case worm (Nymphula depunctalis)
Symptoms
Leaves of plants are eaten by
the caterpillars, which remain within small cylindrical cases and are seen hanging
on the leaves. It occurs in ill drained fields.
The cases may be seen floating on water also. Management 2. If infestation is severe, apply
carbaryl dust or spray.
Rice swarming
caterpillar
(Spodoptera mauritia) Management
Apply carbaryl or trichlorfon as soon
as the caterpillars are noticed.
Rice hispa (Dicladispa armigera)
Symptoms
The adults feed on the green tissues
of the leaves and the feeding scars appear as short white lines on the leaf surface.
The grubs mine the leaves causing formation of white blotches. Early stages of the crop
are more susceptible.
Management
Spray any contact insecticide.
Rice thrips (Stenchaetothrips biformis)
Symptoms
The crop is highly susceptible in
the nursery stage for the first 23-25 days after transplanting/sowing. The tips of leaves
get rolled longitudinally into needle like outgrowths and turn whitish. In severe
cases, the lower leaves also turn yellowish. The infestation may be rated as mild, if there
is less than three needle like leaves and as severe, if there are more than
three outgrowths with the lower leaves also showing chlorosis and scorching.
Management
In severe infestations, apply carbaryl 625 g ai/ha + DDVP 100 per cent
EC/AF 250 ml/ha or dimethoate or quinalphos or phenthoate (EC/AF formulation).
Whorl maggots (Hydrellia philippina)
Infestation is common in the nurseries
and in the main fields up to six weeks after transplantation. Yellowish patches
and streaks are seen along the margins of leaves, which may become deformed. Leaf hoppers
(Nephotettix spp.)
Symptoms
General yellowing of the leaves is
seen, if the attack is severe. When the plants are disturbed, the jassids are seen jumping out.
Management
Apply carbaryl, quinalphos,
imidacloprid or flubendiamide if needed.
Rice mealy bug (Brevennia rehi)
Symptoms
Weak yellowish stunted plants are
seen in patches. White waxy fluff is seen in leaf sheaths.
Management
Dimethoate 0.05 per cent is effective
in controlling the pest.
Rice root
nematode (Hirschmanniella oryzae) Infests paddy roots and make
them partially hollow. Feeding adversely affects absorption of water and nutrients.
Plants show stunted growth in patches. Tiller production is affected.
Management
Dip the roots of seedlings in 0.2
per cent dimethoate for six hours before
transplanting in tracts where nematode attack is detected.
Rice cyst
nematode (Heterodera oryzicola)
The cyst nematode occurs in
various proportions in certain areas of the State.
The symptoms of infestation include leaf
chlorosis, stunting and reduction in the number of leaves, earhead length etc. In
seriously affected patches, yield is substantially reduced.
* Dosage applies to the crop stage of booting and beyond. For early stages the quantity of
insecticides can be reduced
** This is a special micronised formulation with better spreading quality
SP = Soluble Powder; DP = Dustable Powder; G = Granule; EC = Emulsifiable Concentrate;
AF = Aqua Flowable; WP = Wettable Powder; S = Sprayable suspension SL = Soluble Liquid
SC = Suspension Concentrate; WDG = Water Dispersible Granule.
2. Cultivate tolerant varieties like IR-20 in endemic areas.


5. Allow alleways after every 3m rows
1. Drain away the water from the fields.
Symptoms
It appears in the field sporadically and cyclically in large swarms and feed on
crops gregariously. The nursery and early stages of the crop are attacked leaving the plant
as mere stumps.
Symptoms


Note :
1. Sub-lethal concentration of insecticides may lead to pest resurgence
2. Granular application is recommended only upto the booting stage
3. Spot application method should be resorted to wherever possible
4. Use 200, 300 and 500 1/ha of spray fluid at 10, 25,45 DAT or 30,45, 60 DAS respectively for high volume spray equipment
5. When low volume spray equipment is used the spray fluid can be limited to 90, 120, 180 1/ha, but the quantity of insecticide should remain the same as used in high volume spray 200, 300 and 500 1/ha respectively
6. Waiting periods for quinalphos and malathion are 7 and 3 days respectively
7. In regions where BPH is a regular
pest avoid the application of the following insecticides due to the chances
of resurgence:, deltamethrin, carbaryl, and quinalphos.
Diseases Major symptoms of the disease are
leaf blast and neck blast. Sometimes nodal infection is also seen.
Symptoms on leaves appear as
spindle shaped water soaked greyish green spots, which gradually enlarge in size and
develop to spots with grey centre and brown margin.
Such spots coalesce together resulting in drying up of the leaves and collapse of
the entire plant. The fungus infect the neck of the panicle causing dark brown to
black lesions resulting in rotten neck or neck
blast. This will also lead to breaking of the
panicle at the neck region. The grains will be
partially filled or unfilled If the panicle is
infected before grain filling stage, the entre
panicle will be chaffy. Sheath blight (Rhizoctonia solani)
Symptoms first appear on the lower
leaf sheath near the water level as oval, oblong or irregular greenish grey spots,
which enlarge and become greyish white with brown margin. Under favouarble
conditions, the disease spread to the leaves also.
Irregular greenish grey lesions with dark brown margins develop on leaves. Under
humid conditions, white mycelial growth of the fungus as well as initially white and
later brown sclerotia of the fungus loosely attached to the affected portion are also seen.
Brown spot (Helminthosporium oryzae)
On the leaves small definite spots of
oval or oblong shape and dark brown colour are formed. On susceptible varieties, spots
are larger in size and are having light brown or grey center with dark reddish brown margin.
The symptoms also appear on glumes
as black oval or oblong spots or whole surface of the grain turn black and velvety.
Narrow brown spot (Cercospora oryzae)
Numerous narrow linear short
brown spots are formed on the leaves.
Stack burn (Alternaria padwickii)
Symptoms appear on leaves as large
oval or circular dark brown lesions with narrow distinct margins. On the affected grains
pale brown to whitish spots with dark brown margin bearing black dosts in the center
are formed.
Leaf scald (Rhynchosporium oryzae)
Lesions with typical zonations with
dark coloured wavy lines usually start from the tip of the leaves and extend downwards
or arise from the margin and advance inside.
Sheath rot (Sarocladium oryzae)
The fungus infects the leaf
sheath enclosing the panicle causing oblong or irregular brown spots which later develop
into a lesion with dark brown margin and grey center. The young panicle remains inside
the sheath or rather chocked and emerge only partially. The grains become chaffy A
white powdery growth of the fungus can be seen on the surface of rotten sheath
particularly inside the sheath. False smut (Ustilaginoidea vireus)
The symptoms visible only after
flowering when infected grains get transformed to yellow to orange spore balls, which later
turns to dark green or black.
Udbatta (Ephelis oryzae)
Whole panicle transformed into
a cylindrical rod covered with white mycelia Later they become hard bearing many
black dots.
Foot rot (Fusarium moniliformae)
Drying of leaves and leaf
sheath discolouration of lower nodes and
adventitous root formation are the major symptoms. Plants turn pale yellowish green, thin
and some times show abnormal elongation or rot in patches in the field.
Bacterial diseases
Bacterial blight (Xanthomonas
oryzae pv.oryzae)
Bacterial blight is chararcterised by
two phases of infection Kresek and leaf blight Kresek is drying or wilting of the whole
plant if affects the crop in early stages of
growth in nurseries and upto 3-4 weeks after transplanting. The infected leaves
become grayish green and begin to roll along the midrib and dry in severe cases the
affected hills may be completely killed.
Leaf blight symptom start as
water soaked lesions on the tip of the leaves and increases in length downwards along
the margins. lnitially the lesions are pale green in colour and later turn into yellow to
straw coloured stripes with wavy margins. Occasionally the linear lesions may
develop any where on the leaf lamina or along the midrib with or without marginal
stripes Lesions may cover the entire leaf blade.
The bacterial blight disease can be confirmed by ooze test. Cut the affected plants at the
base and dip it in a glass of water and hold it
against the light for few minutes without shaking. From the cut ends white milky bacterial
ooze will come out as streams.
Bacterial leaf streak
(Xanthomonas oryzae pv oryzicola)
Narrow brownish yellow
translucent interveinal lines joining to form large
dirty white patches.
Note :
1. Spray fresh cowdung extract for
the control of bacterial blight. Dissolve 20 g cowdung in one litre of water; allow
to settle and sieve. Use supernatant liquid.
2. Application of bleaching powder @ 5
kg ha-1 in the irrigation water is
recom-mended for checking the spread of bacterial leaf blight particularly in
the kresek stage.
3. Before application of antibiotics for
the control of bacterial blight, identify the disease by observing the bacterial ooze.
4. For control of sheath blight and
sheath rot the following prophylactic measures may be adopted.
a) Apply neem cake-coated urea as recommended under fertilizer application.
b) Apply 50 per cent more potash
than normal recommended dosage in split application.
c) Control weeds as suggested
under weed control.
5. For control of sheath rot, spray
the fungicides at the time of panicle emergence.
6. In organic farming, for the
management of sheath blight of rice, spraying Azadirachtin 0.03 per cent EC
or Azadirachtin 0.15 per cent w/w @ 2.5 litres
ha-1 at the time of first disease appearance.
7. Spraying of any fungicide,
preferably dithiocarbamate before the heading
stage of the crop may be followed for the control of false smut and leaf
scald diseases. Wherever control measures are adopted for sheath blight and sheath
rot diseases, separate treatments are not needed for the control of
leaf scald and
false smut. Use 500 litres of water
for high volume spraying and 200 litres for low volume spraying. It is advisable
to use chemical on a rotational basis than using the same product
continuously.
Fungal diseases
Blast (Pyricularia grisea)

Hints for reducing cost of cultivation
1. Grow a green manure crop like daincha in April-May in areas where the virippu crop is usually transplanted.
2. If azolla is available, this may be applied instead of green leaf or FYM at 5t ha-1.
3. Puddle and level the field thoroughly. This will help to reduce the cost of weed control and also the loss of water and nutrients through percolation.
4. Maintain optimum plant density per unit area, i.e., 50 hills/m2 for medium duration varieties and 67 hills/m2 for early duration varieties.
5. Plant the seedlings shallow (3-4.5 cm), as shallow planting increases the tillering of seedlings.
6. Control the weeds during the vegetative phase itself. One weeding thoroughly on the 30th day after sowing is ideal. Use herbicides for weed control, wherever it is cheaper than hand weeding.
7. Under good management practices (vide item 1-6) reduce the dose of fertilizer N to half the present recommended level. Apply the fertilizer when the plant is able to make the best use of it, at tillering and seven days before panicle initiation.
8. When the field preparation and planting are done on rainy seasons, postpone the application of the basal dose of nitrogen to the early tillering stage (10 days after planting).
9. Use of Leaf Colour Chart (LCC): The leaf colour chart (LCC) is an instant, easy and low cost technique for N diagnosis of current crop and N topdressing in rice. The uppermost fully opened leaf of the primary tiller has to be taken for observation. Ten hills are selected at random for an area of 400 sqm and thus 10 leaves form the sample size. The leaf colour is compared with LCC and the readings are taken. The average of
10 readings gives the LCC value of the plot. Observation is taken at 10 days interval from 20 days after transplanting or 25 days after sowing upto heading. If the threshold value is less than 4, N@ 25-30 kg/ha is recommended for application. If the inherent soil N is low, basal N @ 25-30 kg ha-1 is to be applied.
10. When the amount of available N is limited, apply it 7 days before panicle initiation. This is the best time for top dressing N.
11. Adopt agronomic practices for increasing fertilizer use efficiency such as: (a) Incorporating ammoniacal N in the reduced zone in the soil (b) Incubating urea with moist soil (1:6) for 24 hours (c) Blending urea with neem cake.
12.Choose fertilizer materials, which are cheaper, e.g. urea is cheaper than ammonium sulphate; rock phosphate is cheaper than superphosphate.
13. Apply phosphatic and potash fertilizers once in two seasons in areas where there is no marked response for these nutrients.
14.Adopt integrated pest management against insect pests and diseases.
15. Harvest the crop at optimum
moisture content in order to avoid loss due to shedding and also for improving
the recovery of rice.
Mechanical Transplanting in Rice 1. Use very thin polythene sheet
2. Select nursery area near to the main field
3. Cow dung powder may be
incorporated @ one third volume of the puddled
soil and spread over the sheet at a thickness of 10-15mm
4. The sheet may be spread after
leveling the nursery area
5. Form small bunds along the
boundaries of the polythene sheet, after spreading it, to impound water.
6. Mat nursery may be of 900mm width
and convenient length 8. Seedbed may be mulched,
preferably using green leaves
9. Sprinkle water over the seedbed for
four days twice daily and keep soil in saturated condition. Never allow mat to dry up.
10. On 4th day remove the mulch and
keep standing water to a height of
3/4th of seedling height. Keep this condition
till the end of nursery period.
11. Closely observe the nursery for pest
and disease attack and adopt control measures, if required.
12. When seedlings reach a height
of 150mm, mat is ready for transplanting.
13. Drain the required mat area 6-12
hours before cutting for feeding into the transplanter trays.
14. Cut the mat strips 225mm wide
and 450mm long to match the measurements of the transplanter trays.
15. Do not allow nursery to over grow.
Over growing will lead to entanglement of seedlings with fingers of transplanter
and clogging of fingers due to thick and hard mat of roots.
B. Main field
1. Prepare the main field
adequately, without clods and stubbles interfering
with functioning of finger.
2. Prepare main field sufficiently early
to avoid floating of puddle while transplanter is working
3. Final preparation may be done on the
day of transplanting in case of sandy loam soil, but may be done 3-4 days prior to
planting in case of clayey soils, depending upon settling time of the puddle to consolidate. (Too much water in the field will lead
to floating of seedlings and too dry condition to non-anchoring of seedlings).
5. Main field should have irrigation
and drainage facility
6. Wetting of mat may be required
while transplanter is in operation.
Integrated pest management (IPM)
in rice
The indiscriminate use of pesticides
for pest control has led to disturbances in
natural ecosystem leading to resurgence of pests, secondary pests outbreak, toxic hazards
and residues besides environmental pollution.
This has led to major emphasis on
integrated pest management and gained greater momentum. Integrated pest
management programmes promote favourable,
ecological, economic and sociological outcome,
which is accomplished by the best mix of pest control tactics. The use of
appropriate scouting tactics, proper diagnosis of pest,
the use of economic thresholds and conservation of naturally occurring biocontrol agents
are fundamental components of a sound Integrated pest management
programme. The use of chemical is restricted. It is
used only if it is absolutely essential based on surveillance. The important components
in the IPM are the use of tolerant/resistant varieties, regulating planting density,
adjusting the time of planting / sowing, group
farming practices, cultural management of pests, integrated nutrient management, removal
of weeds, use of botanical pesticides and preservation of natural enemies. For
the preservation of natural enemies, collect the egg masses of pests in perforated
polythene bags and keep them in the field so that
the parasites that emerge can establish in the
field effectively.
Trichogramma chilonis and
Tricho-gramma japonicum are egg parasitoids
which effectively control egg mass of
leaf roller, stem borer, skippers and cutworms. The parasitoids have to be released
15-30 days after transplantation or 25-30
days after sowing or immediately after noticing moth activity in the field. The release rate
is 1 lakh parasitoids/ha of both size (5cc ha-1). The release has to be carried out at
weekly intervals. The trichocard have to be cut
into small pieces (minimum 10 pieces) and released in main field, 6-8 releases
is necessary to control the pest.
Precaution : If larval attack is observed in
the field, necessary
organic/inorganic insecticides have to be used and a gap of
7 days has to be given before next release.
The trichocards have to be placed during early morning or late evening hours and should
not come in direct contact with sunlight.
A. Mat Nursery Preparation
7. Just sprouted seeds (4th day of
soaking) may be uniformly spread over the mat area @ 0.4 to 0.6kg
m-2
4. A thin film of water only is needed in the main field at the time of transplanting.


C. Birds
a. Install artificial nesting sites viz., wooden nest boxes in the rice fields (@ 12 nests ha-1) for colonization by cavity nesting birds (magpie robin, common myna, barn owl, etc) which play a vital role in managing a variety of insect and non-insect pests. The nest boxes should be installed at a height more than 8 feet on wooden pole, tree trunk, etc.
b. Installation of bird perches @ 50 ha-1 increases the activity of insectivorous birds and reduces the pest population in rice fields. The perches should have a minimum height of 75 cm above the crop canopy for better visibility for the birds.
c. Tying metalised reflective ribbon @ 20 - 25 rolls ha-1 at 75 cm above
the canopy of the vulnerable stage of the crop on bamboo poles, 2.5 3.0 m apart at
convenient length, twisted at every 1
m length scares away the depredatory birds. Effective and eco-friendly pest
manage-ment in wet land rice ecosystem
1. Cultivate tolerant varieties
2. Monitor the field at least at
weekly intervals
3. Pest and natural enemy population
should be monitored for deciding spraying schedule.
4. Spraying should be avoided during
the reproductive phase.
5. Spot application of insecticide may
be adopted in heavily infested pockets to control further spread of the pest and
to conserve the existing natural enemy population in rice ecosystem. MAIZE (Zea mays)
Maize can be grown throughout the
year at altitude ranging from sea level to about 300 m. Maize grows best in areas with
rainfall of 600-900 mm. It requires fertile, well-drained soil with a pH ranging from
5.5-8.0, but pH 6.0-7.0 is optimum.
Season
As a rainfed crop, maize is grown in June-July or August-September. The
irrigated crop is raised in January-February.
Varieties
Hybrids: Ganga Hybrid-1, Ganga
Hybrid-101, Deccan hybrid, Renjit, Hi-Starch.
Composite varieties: Kissan
Composite, Amber, Vijay, Vikram, Sona, Jawahar.
Seeds and sowing
Seed rate: 20 kg ha-1
Plough the land three times and
prepare ridges and furrows. Dibble one seed per
hole at a spacing of 60 cm x 23 cm for the rainy season crop. For irrigated crop, beds are
prepared. Here, seeds are sown in lines
and earthed up later in to small ridges to form furrows when the crop reaches knee height.
Manuring
Apply FYM/ compost @ 25 t ha-1 at
the time of preparation of land. The recommended fertilizer dose is 135 kg nitrogen, 65 kg phosphorus and 15 kg potash per
ha. Apply full dose of phosphorus and potash
and 1/3 dose of nitrogen as basal. Apply 1/3
nitrogen, 30-40 days and the rest 60-70
days after sowing.
Aftercultivation
Hand hoeing and weeding on the
21st and 45th day after sowing. Irrigation
Plant protection
Need based application of carbaryl is
recommended for control of pests
SORGHUM (Sorghum bicolor)
Irrigate the crop on the day of sowing and
on third day. Subsequent irrigations may
be given at 10-15 days intervals.
Sorghum is a plant of hot and warm
localities. The optimum temperature
for growth is 30oC and it needs about 250-400
mm rainfall. Excess moisture and prolonged drought are harmful. It is fairly tolerant
to alkalinity and salinity.
Seasons
Rainfed crop : May-August
Irrigated crop : January-April
Varieties
Co.1, Co-10, Co-12, Co-17, K-1, K-2
Hybrids - CSH-1 to CSH-4, Co-11, Co-1
Seeds and sowing
Seeds are sown @ 12-15 kg ha-1.
Dibble two seeds/hole, at a spacing of 45 x 15 cm.
Manuring Fertilizers may be applied as follows:
Nutrients / ha Irrigated crop Rainfed
crop
N 90 kg 45 kg
P2O5 45 kg 25 kg
K2O 45 kg 25 kg
Apply FYM and entire quantity of
phosphorus and potash as basal dose. Apply
nitrogen in two equal splits, half as basal and the rest 30 days after sowing.
Aftercultivation
Thinning, weeding and hoeing may
be done on the
20th day after sowing.
Irrigation
Irrigate the crop on the day of sowing
and thereafter at 10 days interval. Plant protection
Apply carbaryl at milky stages for
the control of earhead bugs.
Spray zineb @ 2kg ha-1 on
30th and 45th day after germination for the control of
foliar diseases.
For both irrigated and rainfed crops FYM / compost may be applied @ 5 t
ha-1.
RAGI (Eleusine coracana)
Ragi is suited for cultivation in areas with annual rainfall of 700-1200 mm. It does not tolerate heavy rainfall and requires a dry spell at the time of grain ripening. It grows well in altitudes of 1000-2000 m with average
temperature of 27ºC. Ragi is cultivated mostly in red lateritic soils. Relatively fertile and well drained soils are the most suitable.
Seasons Late season: July-October
Summer: Dec-Jan to March-April
Ragi is not a season bound crop and hence can be cultivated throughout the year, if moisture is available. It is usually grown
during the following seasons.
Main season: June-September
Varieties
PR-202, K-2, Co-2,Co-7,Co-8,Co-9,
Co-10 Seeds and sowing
Seed rate
Direct sown crop : 5 kg ha-1
Transplanted crop : 4-5 kg ha-1
Spacing : 25 x 15 cm
Prepare the nursery field to a fine
tilth. Incorporate FYM/compost 5 t ha-1 and
form beds and channels. Sow seeds
uniformly on the beds and cover by
stirring the soil. Apply carbaryl 10 per cent on
the edges of the beds against ants. One week before uprooting seedlings, apply
ammonium sulphate @ of 1 kg per 100 m2. A nursery area of 480
m2 is necessary to raise
seedlings for one hectare. Transplant
the seedlings when they are three weeks old. Aftercultivation Irrigation
Irrigate the field on the day of transplantation. Irrigation at weekly intervals
increases growth rate and yield.
Manuring
Plough the field 3-4 times and incorporate FYM or compost 5 t
ha-1. Apply nitrogen, phosphorus and potash @ 22.5 kg
ha-1 each before sowing or planting. Topdress nitrogen @22.5 kg ha-1
21 days after sowing or planting.
Weeding should be done three weeks
after sowing and completed before top
dressing.
Plant protection
For controlling grasshoppers, spray
carbaryl 50 per cent WP @1.2 kg
ha-1. The pink stem borer, which causes dead heart symptoms, is often serious in the early
stages of the crop. Insecticidal control is not
needed for mild to moderate levels of infestation. For controlling blast, spray mancozeb
750-1000 g ha-1.
Harvesting
Harvest the crop when the ears are
yellowish brown. Heap the harvested
ears and cover the heaps with ragi straw for
2-3 days before threshing.
Citation:
Kerala Agricultural University. 2011. Package of Practices
Recommendations: Crops.
14th Edition. Kerala Agricultural University, Thrissur. 360p.